
Checking in should feel effortless, but behind every smooth arrival is a quick step that protects both guests and property owners: ID verification. It may sound formal, but it’s really just about making stays safer, smarter, and stress-free.
In this guide, we’ll explore why ID verification matters, what’s required, how to complete the process, and how it benefits both hosts and travelers.
Why Do We Verify Guest IDs?
First, let’s understand the purpose behind guest ID verification.
- Security first: It confirms that the person who booked is the same person checking in. This prevents fraud and strengthens trust.
- No front desk? No problem: In self-check-in units, documents act as the virtual front desk, ensuring a safe and smooth arrival.
- Age checks: It ensures guests meet the property’s minimum age requirements 🎂 — something that protects both hosts and local laws.
- Location rules: Additionally, some hotels or vacation rentals limit bookings for nearby residents 📍.This is a safeguard against misuse or safety risks.
- Dispute protection: Finally, verified documents help resolve issues if a guest later disputes a charge or denies making a booking
What Documents Are Needed?
Next, let’s cover the documents that are usually requested during verification.
- Passport
- Government-issued ID
- Driver’s license
👉 If the cardholder is different from the reservation holder, then documents for the cardholder may also be required.
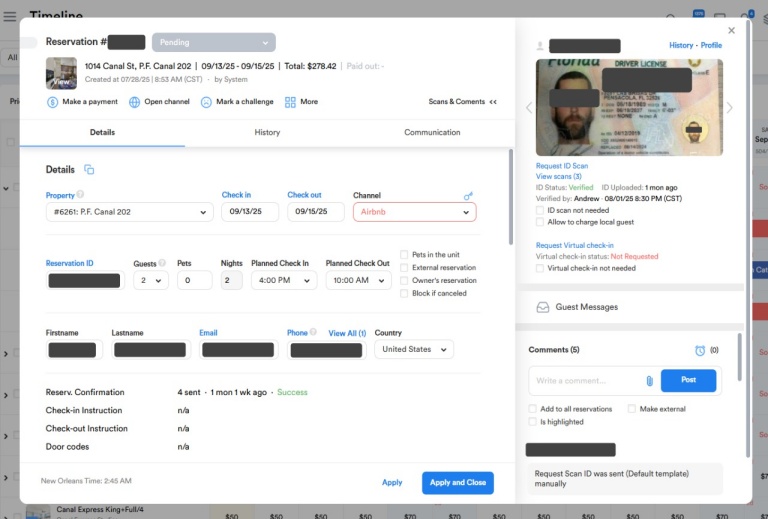
What’s Checked During Verification?
Now that we know what documents are needed, let’s explore what hosts or property managers actually look for:
- Expiration date → First, check if the ID is still valid.
- Date of birth → Next, confirm the guest is of legal age.
- Name match → Finally, verify that the name on the ID matches both the reservation and payment details.
In some cases, properties may also request a scan of the ID before processing payment
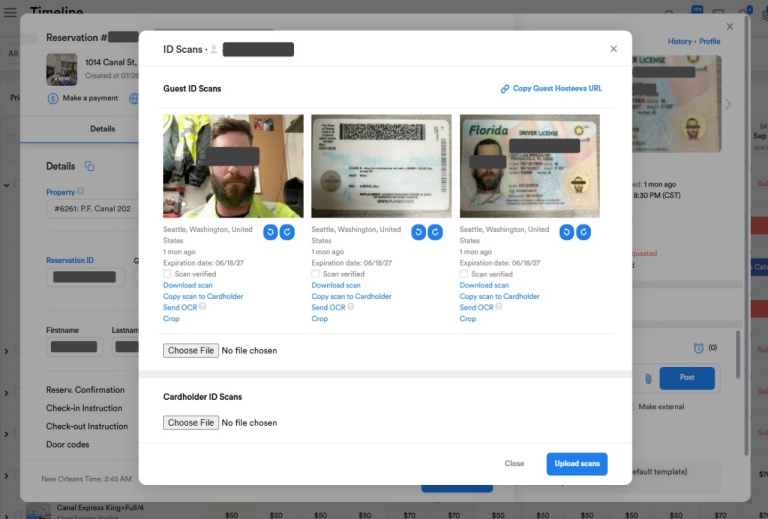
How to Verify Guest Documents
Once you’ve collected the documents, here’s how the actual verification works step by step:
- Check the ID status – To begin, look for partially provided, verified, not needed, or expired.
- View scans – Next, open the uploaded documents.
- Verify details – Then, rotate if needed and click the “scan verified” mark.
- Confirm status – Finally, the system updates with who verified the document and when
This process not only ensures safety but also builds confidence between the guest and the host.
Benefits for Guests and Hosts
Therefore, ID verification doesn’t just protect property owners — it also reassures guests that their booking is safe and legitimate.
- For guests: A verified process builds trust, helps them feel secure, and speeds up check-in.
- For hosts: It minimizes risks, prevents underage or fraudulent bookings, and supports dispute resolution.
Both sides benefit from smoother stays and stronger peace of mind.
Final Thoughts
In conclusion, guest ID verification may seem like a small step, but it’s the foundation of a safe and seamless hospitality experience. By reviewing documents properly, both guests and owners can relax knowing everything is in order.


